NTLite Migration
Since many developers already create ISOs using NTLite, we’ve outlined a guide below for converting your NTLite configuration to the Playbook format.
Note
This is an advanced guide, and requires a decent level of technical skill. If you run into issues, contact @styris_ame on Telegram.
Capturing Component Changes
Before following the steps below, it is implied that you already have an NTLite installation and an extracted Windows image directory ready for use in NTLite.
Important
Ensure that you have a properly licensed version of NTLite. Ameliorated does support the use of illegitimate copies.
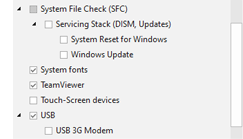
Start NTLite and load your image as you would normally, then load your preset. With the preset loaded, navigate to Components → Compatibility and uncheck Servicing Stack (DISM, Updates).
Download ProcessMonitor, unzip it, then run
Procmon64.exe. Once it opens, click the Capture button to stop it, then click the red trash icon to clear the logClick the blue Filter button, and add the following items:
Process Name → contains →NTLite
Operation → contains →SetDispositionInformationEx
Path → contains →NLTmpMnt01\Windows\WinSxS\manifests
Path → contains →NLTmpMnt\Windows\WinSxS\manifests
Path → contains →NLTmpMnt_01\Windows\WinSxS\manifests
Then click OK
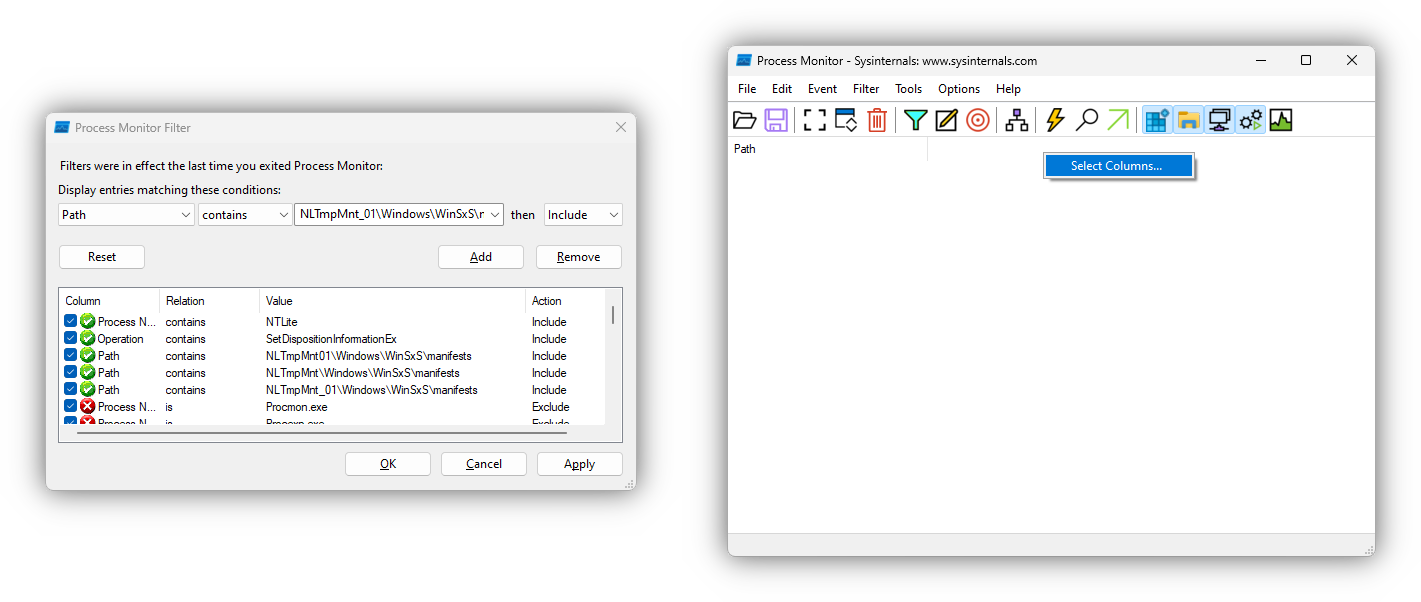
Right click the top columns bar and select Columns, then uncheck everything besides Path. After this, close the columns window, and click Capture in ProcessMonitor to start the capture
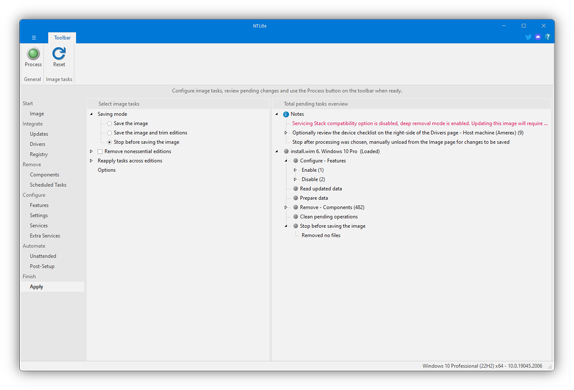
In NTLite, select Apply → Stop before saving the image, then select Process. Now wait for the process to complete
Click Capture in ProcessMonitor to stop the capture, then navigate to File → Save… → Comma-Separated Values (CSV) → OK, and save it to a location
Right click the saved CSV file, and select Edit, then create a new blank line at the top. After this, then replace
"Path"on the second line with the following:
mkdir "%~dp0\Manifests\Raw"Navigate to Edit → Replace, in the Find box, enter ‘
"C:\’, in the Replace box, enter ‘copy /y "C:\’, then click Replace all. Similarly, do the same thing with ‘.manifest"’ in the Find box, and ‘.manifest" "%~dp0\Manifests\Raw"’ in the Replace boxSave the file, close Notepad, and change the file extension from
.CSVto.bat. Do NOT run it yetIn NTLite, navigate to Image and Unload the mounted image. Do NOT save the changes. After this, Load the image again
Double click the
Logfile.batfile from before, and wait for the window to automatically closeA folder should now exist in the same directory as
Logfile.batcalledManifests. Download Manifest Converter into thatManifestsdirectoryRun
ManifestConverter.exe, and wait for it to complete
You will now have converted manifests, along with a formatted packages.yml ready to be tested in a Playbook.
Warning
The resulting YAML file should be thoroughly tested, and any issues should be resolved with trial and error, ideally using a virtual machine with a snapshot to easily restore back and try again, removing actions until you narrow down the culprit.
Feature Changes
NTLite can configure Windows features. This can easily be done on an active system using a Playbook as well, which we describe how to do below.
Feature or capability
NTLite features can be one of two things, either a Capability or a standard Feature.
To find out which of these it is, find the feature name in your NTLite preset by opening your preset XML file and locate the Features value array. In there you will find each feature that your preset removes.
Next, on any installation of your target Windows version, run the following command in an administrator Command Prompt window:
DISM /Online /Get-Features
If it is a feature, it will be shown in the output of that command. Otherwise, it is a capability and will be shown in the output of the following command:
DISM /Online /Get-Capabilities
Note
If you are unable to use a live machine, you’ll need to mount your ISO file, and then mount the WIM or ESD file within.
Configuring a feature
In a YAML task file, you can use the following syntax to disable a feature:
- !cmd:
  command: 'DISM /Online /Disable-Feature /FeatureName:"<Feature Name>" /NoRestart'
  weight: 30
Or, to enable a feature:
- !cmd:
  command: 'DISM /Online /Enable-Feature /FeatureName:"<Feature Name>" /NoRestart'
  weight: 30
Configuring a capability
In a YAML task file, you can use the following syntax to disable a capability:
- !cmd:
  command: 'DISM /Online /Remove-Capability /CapabilityName:"<Capability Name>" /NoRestart'
  weight: 30
Or, to enable a capability:
- !cmd:
  command: 'DISM /Online /Add-Capability /CapabilityName:"<Capability Name>" /NoRestart'
  weight: 30